Normalizer transformation is an Active and Connected transformation.
The Normalizer transformation receives a row that contains multiple-occurring columns and returns a row for each instance of the multiple-occurring data. The transformation processes multiple-occurring columns or multiple-occurring groups of columns in each source row.
The Normalizer transformation parses multiple-occurring columns from COBOL sources, relational tables, or other sources. It can process multiple record types from a COBOL source that contains a REDEFINES clause.
For example, you might have a relational table that stores four quarters of sales by store. You need to create a row for each sales occurrence. You can configure a Normalizer transformation to return a separate row for each quarter.
You can create a VSAM Normalizer transformation or a pipeline Normalizer transformation:
- VSAM Normalizer transformation. A non-reusable transformation that is a Source Qualifier transformation for a COBOL source. The Mapping Designer creates VSAM Normalizer columns from a COBOL source in a mapping. The column attributes are read-only. The VSAM Normalizer receives a multiple-occurring source column through one input port.
- Pipeline Normalizer transformation. A transformation that processes multiple-occurring data from relational tables or flat files. You create the columns manually and edit them in the Transformation Developer or Mapping Designer. The pipeline Normalizer transformation represents multiple-occurring columns with one input port for each source column occurrence.
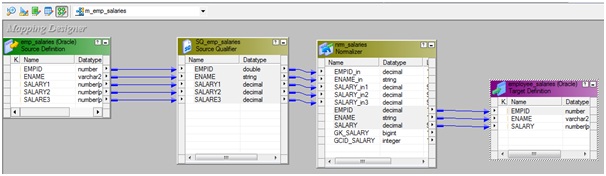
Source Data:
EmpId | Ename | Salary1 | Salary2 | Salary3 |
1001 | Raju | 5000 | 8000 | 10000 |
1002 | Ravi | 6000 | 7000 | 11000 |
1003 | Anil | 4000 | 3000 | 5000 |
Target Data:
EmpId | Ename | Salary |
1001 | Raju | 5000 |
1001 | Raju | 8000 |
1001 | Raju | 10000 |
1002 | Ravi | 6000 |
1002 | Ravi | 7000 |
1002 | Ravi | 11000 |
1003 | Anil | 4000 |
1003 | Anil | 3000 |
1003 | Anil | 5000 |
Sample mapping:
1. Connect and Open the folder if not already opened.
2. Select Tools --> Mapping Designer

3. Select Mappings --> Create
It will pop-up "Mapping Name". Enter the mapping name of your choice" and Click on 'OK'. Example: m_emp_salaries

4. Drag the Source and Target definitions into workspace if they are already exist. If not click hereto know how to create or import Table definitions.

5. Select 'Transformation' from Menu --> Create

a) That will appear you 'Select the transformation type to create:'

b) Select 'Normalizer' from drop down and 'Enter a new name for this transformation:' as "nrm_salaries"
c) Click 'Create' and 'Done'
or
a) Click on Normalizer Transformation icon marked below in below snapshot.

b) Click in the workspace in Mapping Designer.

c) Select NRMTRANS in workspace and Right Click --> Edit.

d) In Transformation tab --> Click on 'Rename' highlighted above which will pop-up 'Rename Transformation'. Enter the Transformation Name: "nrm_salaries"
e) Click on 'OK'
f) Click on 'Apply' and 'OK'.
Note: We cannot drag any port into Normalizer transformation. We have to create port and defined datatypes, length.
6. Select 'nrm_salaries' Normalizer transformation in workspace and Right Click --> Edit.
a) Go to 'Normalizer' tab, to create ports
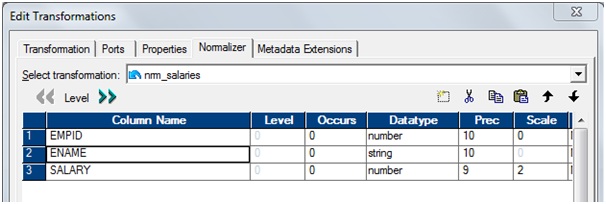
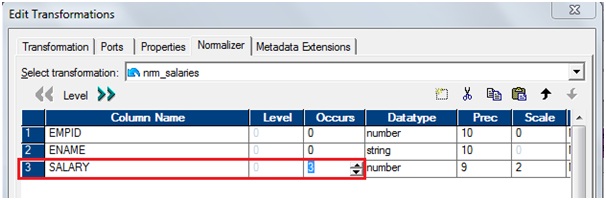
b) Now, defined the 'SALARY' occurrence as 3. Which tells Informatica who many sequence columns need to loop for the other columns.
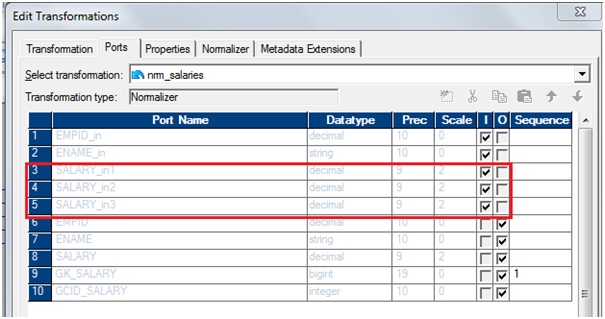
c) Now, go to the tab Port and see, we got 3 ports for salary.
d) Go to the Properties tab
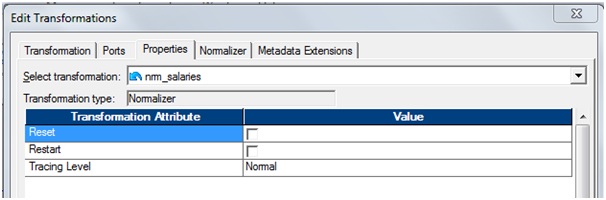
Reset: At the end of a session, resets the value sequence for each generated key value to the value it was before the session
Restart: Starts the generated key sequence at 1. Each time you run a session, the key sequence value starts at 1 and overrides the sequence value on the Ports tab.
e) Click 'Apply' and Click 'OK.

7. Drag required ports from 'SQ_emp_salaries' Source Qualifier to 'nrm_salaries' Normalizer Transformation then 'employee_salaries' target.
8. Select 'Mapping' from Menu --> Validate.

9. Select 'Repository' from Menu --> Save

No comments:
Post a Comment