Update Strategy is an Active and Connected Transformation.
The Mapping still now we have seen are only insert the records/rows into target table. But if you want to update, delete or reject the records/rows that are coming from source exist in target table.
When you design a data warehouse, you need to decide what type of information to store in targets. As part of the target table design, you need to determine whether to maintain all the historic data or just the most recent changes.
Example:
We have a target table T_CUSTOMERS that contains customer data. When a customer address changes you may want to update the address or keep both the old and the new address in the table. In case you update the new address with old address the target table will have always current history or data. In case if you want to maintain both new and old address, we would create a new row containing the updated address and preserve the original row with the old customer address into target table.
The model you choose determines how you handle changes to existing rows.
In PowerCenter, you set the update strategy at two different levels:
- Within a session. When you configure a session, you can instruct the Integration Service to either treat all rows in the same way (for example, treat all rows as inserts/update/delete/data driven), or use instructions coded into the session mapping to flag rows for different database operations.
- Within a mapping. Within a mapping, you use the Update Strategy transformation to flag rows for insert, delete, update, or reject.
Note: You can also use the Custom transformation to flag rows for insert, delete, update, or reject.
Flagging Rows Within a Mapping
For the greatest degree of control over the update strategy, you add Update Strategy transformations to a mapping. The most important feature of this transformation is its update strategy expression, used to flag individual rows for insert, delete, update, or reject.
The following table lists the constants for each database operation and their numeric equivalent:
Operation | Constant | Numeric Value |
Insert | DD_INSERT | 0 |
Update | DD_UPDATE | 1 |
Delete | DD_DELETE | 2 |
Reject | DD_REJECT | 3 |
The Integration Service treats any other value as an insert.
Forwarding Rejected Rows
You can configure the Update Strategy transformation to either pass rejected rows to the next transformation or drop them. By default, the Integration Service forwards rejected rows to the next transformation. The Integration Service flags the rows for reject and writes them to the session reject file. If you do not select Forward Rejected Rows, the Integration Service drops rejected rows and writes them to the session log file.
If you enable row error handling, the Integration Service writes the rejected rows and the dropped rows to the row error logs. It does not generate a reject file. If you want to write the dropped rows to the session log in addition to the row error logs, you can enable verbose data tracing.
Specifying an Operation for All Rows
When you configure a session, you can select a single database operation for all rows using the Treat Source Rows As setting.
The following table displays the options for the Treat Source Rows As setting:
Setting | Description |
Insert | Treat all rows as inserts. Note: The row violates a primary or foreign key constraint in the database, the Integration Service rejects the row. |
Delete | Treat all rows as deletes. For each row, if the Integration Service finds a corresponding row in the target table (based on the primary key value), the Integration Service deletes it. Note: The primary key constraint must exist in the target definition in the repository. |
Update | Treat all rows as updates. For each row, the Integration Service looks for a matching primary key value in the target table. If it exists, the Integration Service updates the row. Note: The primary key constraint must exist in the target definition. |
Data Driven | Integration Service follows instructions coded into Update Strategy and Custom transformations within the session mapping to determine how to flag rows for insert, delete, update, or reject. If the mapping for the session contains an Update Strategy transformation, this field is marked Data Driven by default. If you do not choose Data Driven when a mapping contains an Update Strategy or Custom transformation, the Workflow Manager displays a warning. When you run the session, the Integration Service does not follow instructions in the Update Strategy or Custom transformation in the mapping to determine how to flag rows. |
Specifying Operations for Individual Target Tables
Once you determine how to treat all rows in the session, you also need to set update strategy options for individual targets. Define the update strategy options in the Transformations view on Mapping tab of the session properties.
You can set the following update strategy options:
- Insert: Select this option to insert a row into a target table.
- Delete: Select this option to delete a row from a table.
- Update: You have the following options in this situation:
o Update as Update: Update each row flagged for update if it exists in the target table.
o Update as Insert: Insert each row flagged for update.
o Update else Insert. Update the row if it exists. Otherwise, insert it.
- Truncate table: Select this option to truncate the target table before loading data.
Sample Mapping:
1. Connect and Open the folder if not already opened.
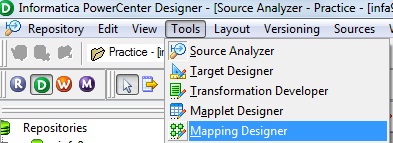
2. Select Tools --> Mapping Designer
3. Select Mappings --> Create.
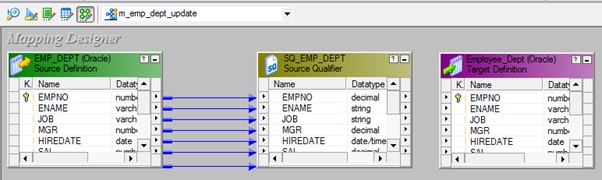
It will pop-up "Mapping Name". Enter the mapping name of your choice" and Click on 'OK'. Example: m_emp_dept_update

4. Drag the Source and Target definitions into workspace if they are already exist. If not click here to know how to create or import Table definitions.
Note:
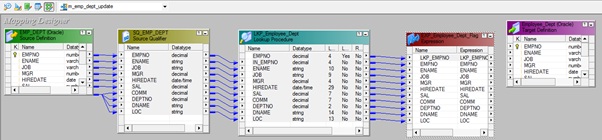
a) To update target table 1st we need to look up on target table and then we need to check whether that record exist in target or not, based on that only will be routing records using router for insert/update.
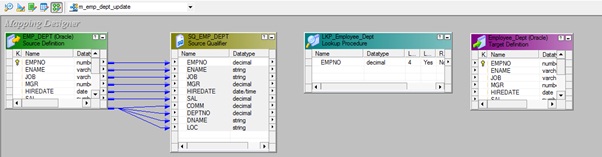
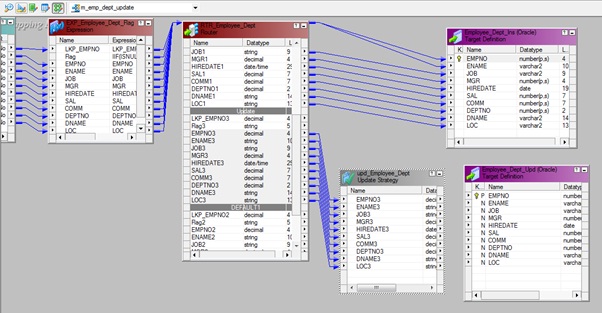
Drag required ports from 'SQ_EMP_DEPT' Source Qualifier to 'LKP_Employee_Dept' Lookup as below.
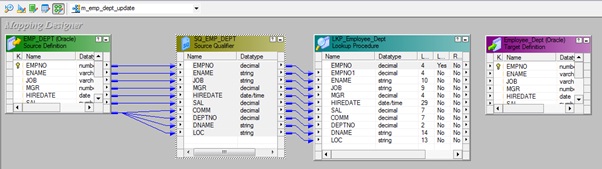
Select 'LKP_Employee_Dept' lookup in workspace and edit it by right click --> go to Condition tab and defined lookup condition.

Click on 'Apply' and 'OK'
6) Please follow the link to create expression transformation.
Drag required port from 'LKP_Employee_Dept' lookup to 'EXP_Employee_Dept_Flag' expression transformation.
Select 'EXP_Employee_Dept_Flag' expression in workspace and edit it by right click --> go to Ports tab and Add a port by Name 'Flag' as below.
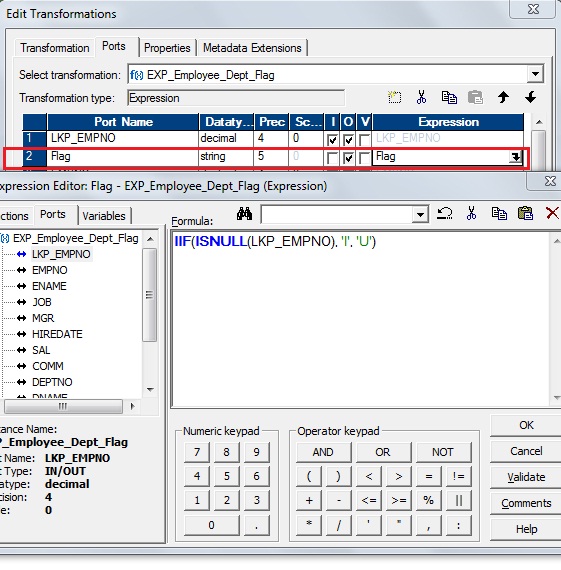
Click 'OK' to close Expression Edit.
Click on 'Apply' and 'OK'
Note: Here we are validating the Lookup values is Null or Not based on the we will flag the input records for 'Insert' or 'Update' target table.
7) Please follow the link to create router transformation.
Drag required port from 'EXP_Employee_Dept_Flag' expression to 'RTR_Employee_Dept' Router transformation to route 'Insert/Update' records flaged.

Select 'RTR_Employee_Dept' router in workspace and edit it by right click --> go to Group tab and Add two Groups 'Insert' and 'Update' as below.

Click 'Insert Group' on Open Browse for Expression Editor as below and defined condition Flag='I' for insert
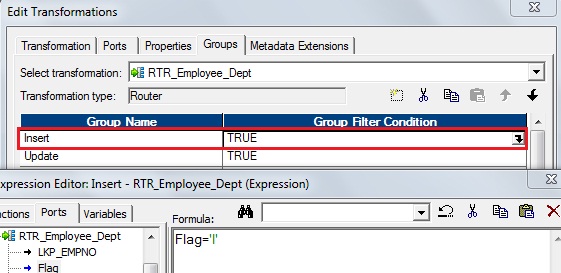
Click on 'Update Group' on Open Browse for Expression Editor as below and defined condition Flag='U' for update

Click on 'OK' to close Expression Edit.
Click on 'Apply' and 'OK'
8). Select 'Transformation' from Menu --> Create
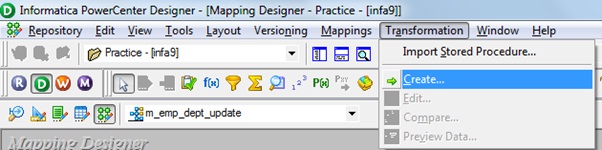
a) That will appear you 'Select the transformation type to create:'

b) Select ' Update Strategy' from drop down and 'Enter a new name for this transformation:' as "upd_Employee_Dept"
c) Click 'Create' and 'Done'

or
a) Click on Update Strategy Transformation icon marked below in below snapshot.

b) Click in the workspace in Mapping Designer.

c) Select UPDTRANS in workspace and Right Click --> Edit.

d) In Transformation tab --> Click on 'Rename' highlighted above which will pop-up 'Rename Transformation'. Enter the Transformation Name: "upd_Employee_Dept"
e) Click on 'OK'
f) Click on 'Apply' and 'OK'.

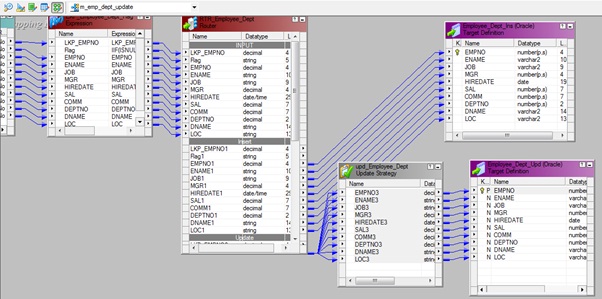
9) Take another copy of target instance, one for insert' Employee_Dept_Ins' and other for update ' Employee_Dept_Upd'

10) Drag required columns from 'Insert Group' in Router transformation to 'Employee_Dept_Ins' target instance.

11) Drag required columns from 'Update Group' in Router transformation to 'upd_Employee_Dept' transformation.
a) Select 'upd_Employee_Dept' Update Strategy transformation in workspace and right click 'Edit'.
b) Go to 'Properties' tab.

c) Click on 'Open Browser' for Expression Editor.
entry: dd_update

Note: See that 'Forward Rejected Rows' is checked. So that Forward Rejected Rows to Next Transformation/Written to Rejected/Bad File. If not it will write it to session log file.
d) click on 'OK', Click on 'Apply' and Click on 'OK'.
12) Drag required columns to update from 'upd_Employee_Dept' Update Strategy Transformation to 'Employee_Dept_Upd' target instance for update.
13) Select 'Mapping' from Menu --> Validate.

14) Select 'Repository' from Menu --> Save.

No comments:
Post a Comment